Category Archives: Shotgun DNA Mapping

The unzipping adapter sequences

Every time I order adapter sequences, I need to go through the same process. This page lists all the sequences used for the unzipping construct’s adapter duplex. The issue is that I only ever need two sequences: a top and a bottom. The top adapter is easy to pick, but the bottom adapter has two possible solutions and I always forget which one. For this I’ll need to reference some order forms to see what I used last time.

Anyways. The top adapter I need is:

  • Top Adapter BstXI/SapI – this adapter has the complementary overhangs for both the BstXI site on the anchor DNA and the SapI site on the unzipping DNA.

And it looks like the bottom adapter I need is the one labeled Bottom Adapter 1a. I’m guessing it is that because: (1) the top adapter on the page is shown annealed to this bottom, and (2) I reference it on this page.

Ok, I’ve verified that the bottom adapter I use most frequently is:

  • Bottom Adapter 1a – which I’ve most recently developed two versions of:
    • GAGCGGATXACTATACTACATTAGAATTCAGAC – this is the original sequence, and the X is actually a dT-biotin (dT is deoxyribonucleotide thymine)
    • TXTXTXAGAGCGGATTACTATACTACATTAGAATTCAGAC – Bottom Adapter 5′ biotin, floppy named because the TXTXTXA is an addition to the 5′ end of the original sequence. The X’s are dT-biotin
    • GAGCGGATTACTATACTACATTAGAATTCAGAC – Bottom 5′-biotin adapter named because I’ve removed the dT-biotin and put the biotin at the 5′ end of the sequence.

So unfortunately the verification process I went through is not open. I had to pull my order forms to Alpha DNA to confirm the sequences. Once I found and confirmed the sequences I emailed them to myself. And now I’m posting them here so the entire record is complete. ONS rules!

Anyway, I never remember what Bottom Adapter 1b is for, but I suppose it is not necessary. In the mean time I found a bunch of older notebook entries that contain information about the bottom adapters:

  • 11/4/09
  • BstXI adapter – I made an adapter to ligate the anchor to itself, and I reference the original bottom adapter called Bottom biotin. I don’t say which one it is, but I’m pretty sure it’s 1a.

I had some other links, but they were either confusing or referred to the bottom adapter without specifying each one. And it is tough searching OWW for the CATG version (1b). Maybe Koch knows? I’ll do some digging later. Research is fun!
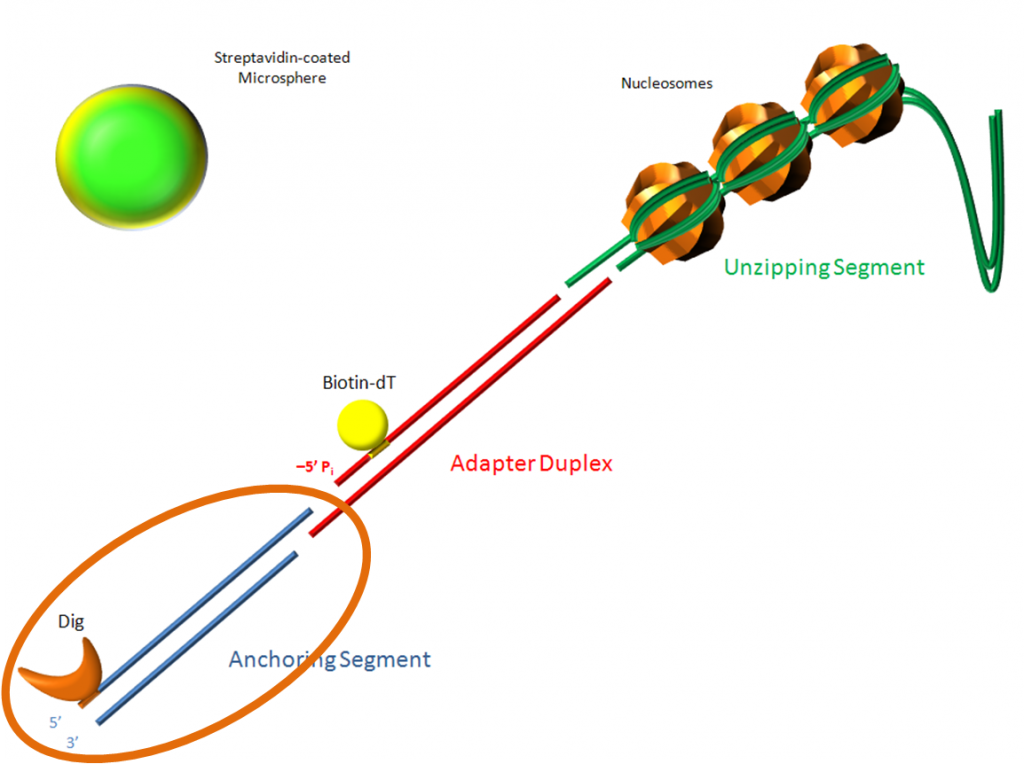
Shotgun DNA Mapping: The Unzipping Adapter

Ignoring the circle, the adapter duplex (the middle piece, red) will be the topic of today’s discussion.

The ligation reaction that I keep referring to requires three pieces of DNA. They get fused together all in one shot, that is slightly complicated. The most crucial of which is the adapter duplex, because without it the anchor and the unzipping DNA would not attach and the reaction would yield nothing. And because of how important the adapter is, this has been the source of my troubles for the past 4 years. But before I go into that, let me tell you about the duplex.

It’s called an adapter duplex because it is actually two single stranded pieces of DNA. We call them the top and bottom strand. They are short DNA sequences manufactured from biotech companies. In the past we’ve used Alpha DNA, but I’m thinking of trying someone new. How short are the strands? The bottom strand has about 35 bases and the top is only a few bases longer. Compare that to the anchor sequence which is either 1100 bp (base pairs) or 4400 bp or the unzipping sequence which can be as long or as short as we want (but typically around 3000bp for calibration sequences).

Once our single stranded sequences arrive via mail (we call these short sequence oligonucleotides, or oligos for short), we need to bind the top and bottom strands together in a process called annealing. Most molecular biological reactions involve some kind of enzyme to help the reaction, but annealing is quite a natural process. DNA naturally wants the bases to bind to complementary bases (A-T, G-C) and even in single stranded form, the DNA will self anneal, that is bind to itself. So to get our top and bottom strands to stick together we just put them together in the same tube, heat it up to near boiling temperatures, and slowly bring the temp down so that the top and bottom strands find each other and bind. Once it’s cooled, the adapter duplex is formed and will stay that way unless heated to very high temperatures (near boiling).

There are three key features of the adapter duplex: (1) a biotin molecule, (2) a gap in the DNA backbone, and (3) two non-palindromic overhangs. The overhangs are designed to bind with a very specific sequence. One side can only bind with the overhang I mentioned in the anchor DNA, the other side can only bind with the overhang contained in the unzipping DNA. Right now that particular sequence is very specific to cutting plasmid pBR322 with the enzyme SapI (and any other plasmids that share similar properties).

The biotin is necessary for unzipping. The biotin has a high affinity for streptavidin which coats the microspheres we use for optical tweezing. Typically the biotin in our bottom adapter strand is near the start, but not at the start of the sequence. In more recent iterations, we moved it to the 5′ end completely or added a poly-A overhang with several biotin there. The reason for this is because we’ve been having issues actually unzipping, which I’ll explain in another post. The hope was that by moving the biotin we would get better tethering efficiency and better unzipping. We ended up not getting unzipping results and the tethering efficiency studies were inconclusive.

See wikipedia, DNA article

The bottom strand has both the biotin and the gap (key feature 2), which actually plays a role in the unzipping. Since the tweezers will pull on this side, the gap was designed to aid in the unzipping. Basically the gap was the weakest point in the complete DNA chain and since the microsphere is so close to it the DNA would begin to unzip from this location. The gap is actually a missing phosphorus (the yellow in the image to the right), which prevents the anchor and the bottom adapter strand from connecting to each other.  In later iterations we completely removed the first base to make the gap wider, and the poly-A tail I mentioned was also used to prevent there from being any attachment.

Ultimately I never got unzipping to work. Oddly enough, I ran experiments that verified the ligation reaction worked, but could never get the completed structure to unzip. That’s what this new set of experiments is going to attempt. But before I get to that, I need to tell you about the unzipping DNA portion!

Anchor DNA Sequences

See here for the background behind everything contained below. Note: For now I’m going to link sequences from OWW here. I was going to put the entire sequence, but that would make this page sorta sloppy and it could get lost. So I’m going to make a page that contains all the sequences necessary for Shotgun DNA Mapping.

  • pRL574– This is a non-commercial plasmid provided by Robert Landick. We have a very small supply so I will have to do some cloning to make an infinite supply!
    • primers – according to notes that I have on OWW and Google Docs I’ve had success with F834-dig as the forward primer (and might be the only primer I have in the lab), R2008 and R1985 as the reverse primers. The difference between the two reverse primers is the length of the PCR sequence, which turns out to be a difference of 23bp.
  • pALS– designed by me, purchased and built by DNA 2.0. I’ should have enough for a few PCR reactions, but I may need to clone to replenish my stocks.
    • primers – primer R4500 would bind in two places on the plasmid so I made R4000 to fix this issue. I’ll have to check my paperwork to see which primer has the dig. I think it is supposed to be on the reverse end, but I can’t be sure.

Shotgun DNA Mapping: The DNA Anchor

The complete unzipping structure being unzipped.

In order to unzip DNA, I need to create three pieces of DNA that I will then attach to each other through a ligation reaction. The first piece that I will discuss is the anchor DNA.

The anchor DNA is a very versatile piece of double stranded DNA (dsDNA). From this singular piece, we can choose to unzip DNA or stretch it because of a special sequence contained in the DNA near one end. I’ll get into this a little bit later. But first a couple of questions:

  1. Why is it called anchor DNA? The reason is because we use this piece of DNA to attach our entire structure to a glass surface. This is the point that anchors our DNA while we pull on it for either stretching or unzipping experiments. One of the bases is designed with a digoxigenin molecule attached to it and that base is placed right at the start of the sequence. In our tethering experiments, we coat our glass with an antibody for digoxigenin (dig for short), cleverly named anti-dig, and chemistry causes the anti-dig to bind with dig. You can understand a lot about antigen-antibody interactions here.
  2. How can we decide between stretching and unzipping? Because of how we designed the anchor DNA, we can stretch the anchor segment by default. That means once I produce anchor DNA I can tether it and begin stretching experiments. If we want to unzip DNA, then I take the anchor DNA and cut the end off (the side opposite the dig molecule) in a digestion reaction (more on this another time). That reaction gives me a small overhang (when one side of the DNA is longer than the other). From there I can perform a series of reactions that create the DNA sequence necessary to perform unzipping experiments. Notice that the anchor end is left unchanged, and that is what enables us to perform both stretching and unzipping experiments from this one piece of DNA.

Now the third question is, How do you make the anchor sequence? For this we need to know several sequences, possibly perform some cloning, and perform a reaction known as polymerase chain reaction, or PCR.

I’m not going to go into the details of what PCR is and how it works (google searching will reveal a lot more useful information than what I’d be willing to put here), but what I will say is that PCR allows me to make millions/billions of copies of a sequence of DNA starting with just a few strands of the original sequence and some short pieces of DNA called primers.

Our original sequence comes from plasmids. For the anchor sequence I have two possible starting points: pRL574 is a plasmid that dates back to Koch’s graduate days, and about a year and a half ago I created a brand new plasmid called pALS. Both plasmids are viable options, but serve slightly difference purposes:

  • pRL574 – for this plasmid we have several different sets of primers that allow us to make anchors of different lengths ~1.1kb and ~4.4kb. The 4.4kb sequence we use primarily for stretching experiments, while the 1.1kb sequence is used in unzipping experiments.
  • pALS – this plasmid only produces one length which is about 4kb. But this plasmid allows us to both unzip and stretch as I described above. It also has a couple of very unique features. First, if I cut it in the right spot, I can ligate the plasmid to itself through a special adapter sequence (to be described later). Second, it contains a sequence that is recognize by nucleosomes, that we could use for more complicated experiments down the road.

So as you can tell, I have some options available to me. Normally I would just pick one plasmid to work with, but I want to work with both and figure out which may be the more viable option down the road. In my next post, I’ll link to and list the sequences needed to make the anchor construct, with some explanations as to what everything is.

Shotgun DNA Mapping: Creating the Unzipping Construct

I have a lot of work to do with regard to organizing my thoughts for this project. It has been 1 year since I last thought about this, but it is time to restart it. I’ll explain the history of this project and where I’m going with it in future posts (this week), but for now I’m going to introduce what I need to do this week with some links for me to check out.

Here is an intro to Shotgun DNA Mapping. Go there for a crash course and some links that go further in depth than what I’m ready to divulge at this moment.

Step 1 of Shotgun DNA Mapping (SDM from here on out) is to create the unzipping construct. For that I’ll need some DNA.

There are 3 pieces of DNA required to have a completely unzip-ready object. They are:

  • The anchor – this is a 1kb/4kb (depending on the situation, kb = kilobases) double stranded sequence that is created from the PCR reaction of a plasmid. In our old cases it was pRL574, but I experimented with another sequence that I named pALS. I may start with the pRL574 plasmid to get started. This piece contains a molecule that allows us to attach the DNA to a glass surface (the microscope slide).
  • The adapter duplex – this is technically two single strands of DNA that are annealed together to create a weird double stranded piece. It is ~25bp long and there are tons of variations that I’ve experimented with. This piece contains a molecule that allows us to attach the DNA to a microsphere. It also hosts a space that allow us to essentially break the DNA so we can unzip it.
  • The unzipping DNA – this is the DNA that gets unzipped in the experiment. It can be anything essentially, but for the purposes of SDM we use yeast genomic fragments, and in the very near term I’ll be using pBR322 (a commerically available plasmid) to test the reactions and to calibrate the tweezers.

As I start to figure out what needs to be done I’ll have separate posts explaining everything about each piece. In the mean time here are a bunch of links that will help organize my thoughts:

The order of things that need to get done:

  1. I need to check my inventory. I’m not going to use this stuff for the most immediate experiments, but it will be good to know what I have. I will need to use my supplies of pALS and pRL574 and pBR322, but the adapter sequences will need to be brand new.
  2. Check the DNA sequences.
  3. Order new sequences.
  4. Get into molecular biology – PCR, annealing, ligation, gels, digestions, etc. This is where it gets exciting.

I’ll start by posting pictures and descriptions of the things that I have.

Ouch

Well, I crashed and burned big time last week and let Anthony down.  My apologies, Ugh.  I still think we can revise and submit the shotgun DNA mapping paper, but the timing is not as urgent.  Thus, I am more tempted to port the code to something useful for the public.  Python (with it’s bio library) is what I’m thinking.  Mulling this over.  In the meantime, after many attempts, I finally got the github project going:

https://github.com/stevekochscience/Shotgun-DNA-Mapping–Yeast

It took forever, I think because it’s a huge library.  But it should include most of the sequences and simulations that Larry used for the first draft of the paper.

===

I determined that the whitespace bug is indeed a problem in Larry’s code.  At least the code I’ve found.  In the VI, “initizing sub.vi” it definitely finds zero energies for the \n\r whitespaces.  As far as I can tell, this is not accounted for in the subsequent code.  I will test by using two different sequences and simulating with and without whitespace.  I don’t think this is (was) a problem, though, because the sequences Larry used didn’t have whitespace, I don’t think (at least after he found the XhoI sites)

-> Verified that the whitespace bug exists in “failed simulator again.vi”  to reiterate, though, this probably didn’t affect simulations, since the xhoi sites didn’t have whitespace after he found the sites

data files: Test 2012 pBR_2.dat and Test 2012 pBR_2no.dat (should be in github soon)

SDM Genome text analysis, matching, still looking through Larry’s stuff

10:45 AM: Found some more stuff in \\Controller\users\herskowitz.larry\My Documents

  • This looks like stuff he used for analysis (matching) after simulation messing around has data in it.vi
  • This has promise for being the program that finds the XhoI sequences: new formatting program.vi

Also, some locations of data files

  • \\controller\pub\,dropzone\August 28 pCP681 files for Larry

Some simulation files

  • \\controller\pub\8 and 8b Force Measurements

======

Figured out something that was confusing me: The sequences around the recognition site for both upstream and downstream are stored in the same files in this directory: \\controller\pub\Sequences\Yeast Genome.  So, I think pretty confidently, these are where most of the sequences Larry simulated are.  A remaining question (that I will have to answer via looking at software (probably “new formatting program.vi”)) is whether he threw out sites that were too close to other sites.

-> Note: Github says as long as I keep each public repository under 1 GiB I should be OK on diskspace

====

5:45 PM Still working on github, not sure if I’ll have time to upload tonight.  Git was being super-slow on LarryXP (maybe because I was using a networked folder).  Now copying to my laptop to upload later at home.  About half done in about an hour

Also, There is an important possible bug in Larry software (not sure yet, but definitely a misconception that I had).  He was using a Richard sub-VI called “Trim whitespace” (see picture below) that only removes whitespace from beginning and end of string.  I thought it worked on the whole string.

The Human Genome

Took me more time than necessary because googling “human genome sequence” does not bring up exactly what you’d expect. But I found downloadable human genome sequence data and honestly have no clue what is contained in these files. They are all zipped but labeled .mfa.gz (the .gz is the zipped part), and have no idea what .mfa could be. Shut yo mouth!

Anyways here is what I found:

  • List of all chromosomes and some extra stuff – there are two copies of each chromosome, which makes sense in the human body but not here. One is .fa.gz and the other is .mfa.gz. Hmmm…
  • List of everything – with lots of stuff I don’t understand.

Since one chromosome is as big or larger than the entire yeast genome I think I’ll just “chop up” one chromosome and match some random stuff from that, if we decide to go that route.

DNA sequences for Shotgun DNA Mapping Algorithms

Via Dropbox:

If I can think of other cool things to download and upload to dropbox I’ll add them here.

Yeast genome found… potentially

Ok so yeastgenome.org was kinda complicated to navigate, but once I noticed a handy little link on the top of the site named “Download” then it was much easier. Here are some notes:

  • From the main page click Download. Then click Sequence. On that page is a list of genomes that aren’t S. cerevisiae (something cool for later maybe), and a list of sequence files that are of the reference strain S288C (which I have no understanding of).
  • On that page I clicked genomic_releases/ to get a list of updates for the yeast genome. I’m thinking Larry probably downloaded the most recent at the time which is from June 5, 2008, but I can also see him just picking whatever is at the top (which may have been the same file, it is only labeled “Current Release”).
  • I realize I could have just linked one of those links, but what kind of notebook would this be if I didn’t show you my entire train of thought? A shitty one, that’s what kind!
  • You will need 7-zip to open the downloaded sequence because it is saved as a “.tzg”.
  • I’m also downloading the most recent update to the genome, maybe this will be useful for the matching aspect of the simulation. The date on this file is Feb 3, 2011.