50ml of 1xTAE buffer with 5ul of Sybr Safe (10000x in DMSO) and 0.4g of high quality agarose
microwaved for 2 min
poured into electrophoresis apparatus with 10 well comb (from Owl)
running at 150V for ~40 min
Results:
So the PCR reaction didn’t work again. Hmmm. My first measure of adjustment is usually to adjust the annealing temperature so I’ll start there. Troubleshooting PCR is so annoying, but I want to get some product before next week so work at it I will.
Before I set up my reaction, I need to dilute my oligos from IDT from 100uM to 10uM, and dilute my pALS plasmid from 160ng/ul to 1.5ng/ul or basically a 1:100 dilution.
You may have noticed that this is the same thing I did last week. The difference is I’m using new oligos, DNA, Taq, etc. Hopefully the reaction runs better. Here is my reaction:
I purchased some oligos and now I need to create the adapter duplex from those oligos. This requires an annealing reaction which is super simple to do. Basically you just mix your oligos together, heat them to 95C and then slowly cool the mixture. Nature takes care of all the leg work. I’ve done this reaction 3 different ways:
Heat a cup of water to boiling in a microwave, then remove the water, place your annealing mix in the water (make sure the top is floating), and allow the water to cool on a lab top. Basically allow the water to cool to room temperature (RT).
Put your mix into a heating block and heat that to 95C (or close to boiling). Once the mix has been heated, remove the block from the heating unit and place on a lab top to cool to RT.
Put your annealing mix in a PCR machine which can control the temperature very specifically. Create a program that will: (1) heat the mix to 95C for about 5 minutes, (2) slowly lower the temperature to about RT or 4C or whatever cool temp you want, (3) hold at that low temp until you are ready to remove it and move on.
For today’s reaction I will be using option 3. My protocol for the experiment is below. Unfortunately there is no easy way to verify the annealing reaction is successful. Well that’s not 100% true. You can run an SDS-PAGE gel which has the ability to resolve very short DNA sequences, but I don’t really have the equipment for that right now. I do have a high resolution gel that I’ve been wanting to try. Hmmmm…
I created myself a resuspension calculator that calculates the actual measured concentration from what it should be. IDT has a resuspension calculator that seems to just take the nmole amount and divide it by 1000 to give you the amount to add in ml. My calculator does the same thing, and allows me to input nanodrop values to get a nanodrop measured calculation. Here are the calculations for these oligos:
Also if it isn’t apparent from the spreadsheet, my resuspension buffer is just 0.1x TE buffer. All calculations are in the spreadsheet which is publicly available to make copies of as you see fit.
Yesterday I setup a PCR reaction using both our labs thermal cycler from Thermo and our OpenPCR thermal cycler. I want to make pALS PCR fragments (4kb in length). And here are the results of that experiment (with setup):
Gel Setup:
50ml 1x TAE buffer mixed with 0.4g High Resolution DNA agarose
heated in microwave for 2 min
added ethidium bromide (EtBr) to final concentration of 1ug/ml
gel cooled for 40 min in fridge
Meanwhile, 5ul of 9 of 11 PCR reactions put in PCR tubes with 1ul of 6x loading dye added (for 6ul total per tube)
the tubes selected were 4 tubes from OpenPCR (numbered 1-5) and 5 (of 6) tubes from Thermo thermal cycler (numbered 6-11), so tubes 1-4 and 6-10 were selected for gel analysis. This is because there are only 10 wells and 1 well is needed for DNA ladder.
Once gel cooled, 250ml of 1x TAE added to electrophoresis device (what’s the name of this thing?), filled to cover gel
6ul of each of the 9 prepared tubes were placed in the wells along with 6ul of pre-prepared 1kb DNA ladder.
connected to power supply and run at 150V for 45min
Results:
Gel results. Lanes 2 and 4 have feint bands where the expected PCR result should be.Enhanced gel results.
Based on the images above, the PCR reaction was a failure. Lanes 2 and 4 have very feint bands where the 4kb product should be, indicating the reaction succeeded but not to the degree required. This could be for any number of reasons, but most likely due to inactive enzyme, old reaction buffer, degraded dNTP’s, etc. Basically I’ll be doing this reaction again next week when all my new supplies come in.
Notes about the image acquisition:
Since I ran the gel with the EtBr added to the molten gel, I did not need to run the gel and then add EtBr. I also did not destain the gel after completion of electrophoresis. The images above were captured with my phone camera. To see gel results typically I use SybrSafe from Invitrogen with their special illuminator, but since I used ethidium today I had to use the hand held UV lamp we have. This means worse quality photo, but oh well.
It’s time to get back in the habit of doing molecular biology. I need to refamiliarize myself with the working PCR protocols I have, and determine if OpenPCR is more than adequate for Shotgun DNA Mapping. Using an inexpensive and open sourced platform to produce high quality research rocks my boat and I hope it does yours.
Here’s my reaction setup:
Results to come tomorrow…
Update: When adding the primers to the mastermix, I forgot which primer I added first, so I added the appropriate amounts of both. Essentially this means that there is extra amounts of one of the primers. Hopefully this doesn’t ruin the reaction, but I’m not expecting much since I’m using very old stuff here.
I’m ordering from Integrated DNA Technologies. I was going to order three different versions of the bottom adapter, but decided to just get the two listed above. The one I omitted from the order is the 5′-bio with the floppy overhang (which won’t ligate to anything). Once I get my second supply of money from IMSD I’ll order that oligo.
Today I need to buy microspheres. In the first experiments we used spheres with a diameter of 0.5um (or 500nm), and over time we eventually switched to using 1.0um beads. The reason is because: 1) big beads are easier to see if they are tethered or not, 2) you get better tweezer forces with the larger beads, and 3) the big beads clump less. The only drawback to using the larger beads is that there is a lot of repulsion between the beads and our glass surface so our DNA tethers need to be longer. I invented the 4kb pALS anchor to solve this very problem.
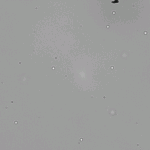
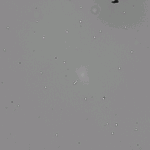
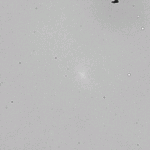
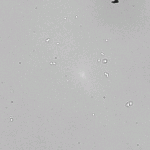
Here are some pictures of the different sized beads in the tethering environment:
Tethered 1um beads mixed with DNA diluted 1:100 (100x)
Tethered 1um beads mixed with DNA diluted 1:20 (20x)
Tethered 1um beads mixed with DNA diluted 1:10 (10x)
Tethered 1um beads mixed with DNA diluted 1:5 (5x)
Clumps 3: Same batch of beads as previous image, but different area of sample.
Clumps 2: Same batch of beads as previous image, but different area of sample.
Small beads after being sonicated. Notice the small clumps.
0.5um beads and 1.0um beads mixed together.
And for completeness here are some old notebook entries regarding those pictures:
And here is a video that shows the tethering results of the DNA experiments listed above:
We want beads that are coated in streptavidin (or some form of avidin) because this molecule creates a very strong bond with biotin which is attached to our DNA for stretching/unzipping experiments.Most commonly, you can order beads with streptavidin, but some companies offer alternatives like avidin or neutravidin. In my experience neither works any better or worse than streptavidin. And in the case of these experiments the bond either holds or it doesn’t.
But believe it or not, it is hard to quantify the effectiveness of the beads. As you can see in the pictures above, both bead concentration and DNA concentration can affect tethering efficiency. And I have suspicions that the sonication process (what we do to prevent the beads from clumping) may affect the streptavidin in some way: in my head the vibration shakes off the molecules from the beads.
With all that said, there are places that I trust buying beads from. In the past I’ve purchased beads from Bangs Labs, Invitrogen, and Poly Sciences. I’ve never noticed that any bead from any company seems to work better than the rest. Because of this I think I’ll order a new stock of beads from Bangs because they pretty much only make beads (so they should do it the best). Note: I just remembered that Bangs, and Poly Sciences may be the same company and it turns out they are affiliated in some way. So I suppose there really is no difference between the two.
Update: I’m placing my order with Bangs Labs. I’m ordering 0.53um beads and 1.04um beads, both coated in streptavidin, and neither are fluorescent.
We’ve discussed the anchor DNA and the adapter duplex, but we wouldn’t be able to measure unzipping forces and shotgun DNA mapping would fail if we didn’t have any DNA to unzip. As I’ve mentioned several times in this series of posts, the entire construct is assembled through a reaction known as ligation.
For the purposes of this experiment, the reaction works as follows: an enzyme known as DNA ligase looks for compatible ends of DNA and attaches them together. In our construct those ends are the overhangs that I referred to in the other posts. And the construct is designed so that the anchor can only attach to one end of the adapter and the unzipping segment can only attach to the other end of the adapter.
Now technically we can use any piece of DNA to unzip. The catch is that we need to use a plasmid to get the overhang that we need. As I said earlier, one side of the adapter can ligate to the anchor. The other end’s overhang is created by a cut from the enzyme EarI and is specific to the plasmid pBR322 and any other plasmids that have the same multiple cloning site. For instance, for shotgun clones (which will be explained much later) we use pBluescript II, and the enzyme SapI cuts the plasmid with the exact same overhang as EarI does in pBR322.
Because of the proximity of the SapI site to the multiple cloning site, we can stick any piece of DNA into the plasmid for cloning. Then we can cut the plasmid with the unzipping insert with SapI and then ligate this long piece to our unzipping construct.
In calibration experiments, we use pBR322 to test to make sure we have unzipping. And eventually we will move up to use the pBluescript clones that I made a few years ago. Although I have a feeling I’ll be doing that all over again.